Platform specific code sample
Adding platform specific code to a NeoMAD project
The PlatformSpecificCode example, which can be found in the Examples directory of the NeoMAD installation, demonstrates how to integrate platform specific code as part of a NeoMAD project. In this example, we want to use the Compass sensor, that is available on Android and iOS. A simple example will just show the magnetic heading value given by the compass.
Project structure
In order to use this option the NeoMAD project must contain two additional folders:
- The specific-def folder contains the Java definition of the specific code. This folder and its content are created by the developer. In order for the non-specific code to interact with the specific code, the developer has to provide a definition of what the specific code will look like. This definition is a classic Java class.
- The specific-impl folder contains the real implementation of the specific code for each platform, that will be embedded into the final binary. It contains sub-folders that represent platforms for which specific code will be implemented (such as Android or iOS). The specific-impl folder and its content are automatically generated by the NeoMAD -gsi option, based on the definition. The generated implementation is the exact image of this definition written in the language of the target platform. Then, the developer can complete the implementation files in order to provide the specific implementation of the feature for each platform.
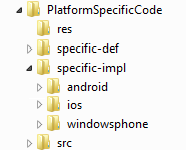
In fact, this is the default structure that allows you to use platform-specific code in a NeoMAD project.
This structure can be customized using two parameters in the <parameters> section of the URS
file:
<specificdefpath>to define the path of the folder containing the definition<specificimplpath>to define the path of the folder containing the implementation
These paths are relative to the project’s root folder, e.g. to use the following structure:
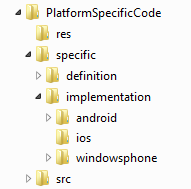
the following parameters must be declared in the URS:
<specificdefpath>specific/definition</specificdefpath>
<specificimplpath>specific/implementation</specificimplpath>
Java definition
The definition of the specific code is already given in the example. It consists of a Compass class, with two methods:
isSupported(), that we use to verify if the compass exists on the target platform- a setter that lets us register a
CompassListenerobject that will give us information about the value of the compass sensor
These two methods have default implementations in the definition: the isSupported() method, for
example, returns false by default. This means that by default, the generated specific
implementation of this method will return false for all the platforms. The generated code can be embedded as it
is and the functional behavior will remain correct.
package com.neomades.specific

public class Compass {

        /**
         * We set the visibility to protected,
         * because this attribute will be
         * accessed by the class extending
         * the generated abstract class
         */
        protected CompassListener listener;

        /**
         * This method is used to know if
         * the compass is supported on the
         * target platform.
         *
         * @return true if the compass is supported
         *         and false if not supported
         */
        public boolean isSupported() {
                return false;
        }

        /**
         * Sets a listener, that will be called
         * every time the compass orientation changes.
         *
         * @param listener
         */
        public void setCompassListener(CompassListener listener) {
                this.listener = listener;
        }
}
Generating the platform specific implementation template
Once the Java definition has been written, the implementation of the specific code can be generated by launching the following command:
neomad -gsi PlatformSpecificCode.urs
This generates the default implementation for all the platforms supported by NeoMAD in the specific-impl
folder.
The implementation consists of two classes:
- an abstract class representing the Java definition,
AbstractGeneratedCompass.java; this class will be overridden each time the -gsi option is called and must therefore not be modified, - an implementation class
Compass.java; with the same name as the definition class, and extending the generated abstract class, this class will contain the specific implementation written by the developer.
Here is what the generated abstract class looks like on Android for the PlatformSpecificCode example:
package com.neomades.specific;

public abstract class AbstractGeneratedCompass {

   protected com.neomades.specific.CompassListener listener;

   public boolean isSupported() {
      return false;
   }

   public void setCompassListener(
           com.neomades.specific.CompassListener listener) {
             this.listener = listener;
       }

}
Platform specific implementation
For platforms that support the compass, the implementation that has been generated must be completed
in order to use the compass with the target platform API.
In the example the complete implementation for Android and iOS is already provided
in the specific-impl folder.
You can then launch a normal compilation of the project with NeoMAD and the
platform-specific sources will be automatically embedded in the generated binary for these platforms.
Finally, you can run the generated application in the emulator or on a device and see how it really accesses the compass information.
Customizing specific project properties
Android versions management
For Android targets, three attributes are available in the URS: minSdkVersion, targetSdkVersion, maxSdkVersion.
By default, minSdkVersion has 8 value, targetSdkVersion has 21 or later (depends on your Android SDK installation),
maxSdkVersion is undefined. To change theses values, the URS file should specify part as follows:
<specific>
             <android minSdkVersion="8" targetSdkVersion="21" maxSdkVersion="21" />
</specific>
Importing libraries into specific code
In most cases, the code written using the specific code feature will require libraries that are not available
by default with NeoMAD. This may be sytem libraries or even third party libraries. Such libraries can be
added to a NeoMAD project thanks to the <specific> tag of the URS.
Importing libraries in Android specific code
To import a jar in the specific code for an Android target, declare it using the tag <specific><android><library>.
<specific>
   <android>
      <!-- Android third party library -->
      <library path="lib/myLibrary.jar"/>
   </android>
</specific>
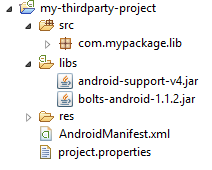
Importing project reference in Android specific code
To import a project in the specific code for an Android target, declare it using the tag <specific><android><project>.
<specific>
   <android>
      <!-- Android third party reference project -->
      <project path="lib/my-third-party-project" />
   </android>
</specific>
Android projects should respect the following file tree:
Importing libraries in iOS specific code
In iOS, libraries can be provided as frameworks or static libraries. Frameworks can be declared in the URS with the tag
<specific><ios><library>. They can refer to third party libraries that must be declared with the path attribute, or
to system libraries that can be chosen among a defined list under the system attribute. Static libraries can be declared
with the tag <specific><ios><staticlib>. In that case, header files must be referenced with the headersFolder attribute.
<specific>
   <ios>
      <!-- iOS third party framework -->
      <library status="optional" path="lib/myLibrary.framework" />
      <!-- iOS system framework -->
      <library status="required" system="Accelerate.framework" />
      <!-- iOS static library -->
      <staticlib headersFolder="lib/myHeaderFolder" path="lib/myStaticLib.a"/>
   </ios>
</specific>
Note
iOS libraries have a status attribute in order to indicate if the library is optional or required. By default it is set to optional.