Android
Here are the specific properties you can configure for the Android output:
- Declaring Android libraries
- SDK versions
- Custom Android Manifest
- Android External projects
- Android template path
- MutiDex
- Network Security Configuration
Declaring Android libraries
External Jar
Please refer to the dedicated documentation to learn how to add external Android libraries.
Gradle dependencies
Gradle remote dependencies and remote repositories can be declared in the <specific><android> tag of URS.
Use the <gradleproperties> tag to add a <dependency> and/or a <repository> to your Android project.
For example, to declare an Android remote dependency com.example.android:app-magic:12.3 and an Android remote repository https://repo.example.com/maven2 :
<specific>
    <android>
        <gradleproperties>
            <dependency groupname="com.example.android" name="app-magic" version="12.3"/>
            <repository type="maven" url="https://repo.example.com/maven2" />
        </gradleproperties>
    </android>
</specific>
SDK versions
It may happen that you do not want your application to support all Android OS version. This
can be configured using the minSdkVersion, targetSdkVersion and maxSdkVersion
attributes of the URS.
The attributes will be explained further in the documentation but refer to the Android official
documentation: https://developer.android.com/guide/topics/manifest/uses-sdk-element.html#uses
to have all the information.
<urs>
    [...]
    <specific>
        <android
            minSdkVersion=""
            targetSdkVersion=""
            maxSdkVersion=""
            >
        </android>
    </specific>
</urs>
Min SDK Version
Specifies the minimum API Level on which the application is able to run.
Note
NeoMAD supports API Level 19 or greater for minSdkVersion
Max SDK Version
Specifies the maximum API Level on which the application is able to run. By default, this value is not filled.
Target SDK Version
Specifies the API Level on which the application is designed to run. In some cases, this allows the application to use manifest elements or behaviors defined in the target API Level, rather than being restricted to using only those defined for the minimum API Level.
Note
NeoMAD supports API Level 24 or greater for targetSdkVersion
API Levels
| Platform Version | API Level | VERSION_CODE |
| Android 10.0 | 29 | Android 10 |
| Android 9.0 | 28 | Pie |
Android 8.1,
Android 8.0
|
27
26
|
O_MR1
O (Oreo)
|
Android 7.1, 7.1.1
Android 7.0
|
25
24
|
N_MR1
N (Nougat)
|
| Android 6.0 | 23 | M (MarshMallow) |
Android 5.1
Android 5.0
|
22
21
|
LOLLIPOP_MR1
LOLLIPOP
|
Android 4.4W
Android 4.4
|
20
19
|
KITKAT_WATCH
KITKAT
|
This is a partial part of the Android API levels. To have a complete vision please refers to the Android official documentation https://developer.android.com/guide/topics/manifest/uses-sdk-element.html#ApiLevels.
Custom Android Manifest
Developers who want to add specific content to the manifest can use a template to create their own manifest files.
This template is located at:
NeoMAD_Installation_directory/fromSdk/android/androidManifest.xmlThe content of this template is the same as the default one used by NeoMAD.
If the default Android manifest provided by NeoMAD is not sufficient for your application or if you need to activate options for a specific target, you can create your own manifest.
Copy/paste the template wherever you want in the project and add your specific content.
Then, tell NeoMAD to use your manifest file by using the <androidmanifest> tag in the URS file.
Warning
You may notice some words beginning with “$”, like “$VERSION”. These tags are used by NeoMAD to automatically substitute data picked from the URS file. This is why your manifest file must be based on the template provided by NeoMAD. All the options declared in the manifest template using these tags MUST be kept and MUST NOT be overridden.
Example
<urs>
    [...]
    <androidmanifest path="path/to/MyAndroidManifest.xml">
</urs>
Android External projects
The specific code may rely on an entire external Android project to work. To import such a project in the
specific code, declare it using the tag <specific><android><project>.
<specific>
   <android>
      <!-- Android third party reference project -->
      <project path="lib/my-third-party-project" />
   </android>
</specific>
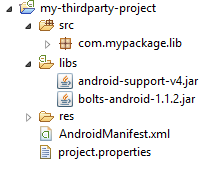
Android projects should respect the following file tree:
Android template path
NeoMAD is based on a template folder to generate the Android Studio project when building for an Android target. This template folder is located at:
platforms/android/AndroidStudio/templatesFor very specific need when specific code is used, you may need to customize that templates (to declare a particular dependency in the build.gradle for example). In order to do that, just copy the NeoMAD template directory in your project and complete it with your specific needs. Then the new template directory must be referenced in the URS file to replace the NeoMAD template directory at buid time.
<specific>
   <android templatePath="path-to-my-custom-template-directory">
   </android>
</specific>
Warning
You may notice some words beginning with “$” (like “$VERSION”) and some files with extension .tpl.
These tags are used by NeoMAD to automatically substitute data picked from the URS file. Be sure to keep
these tags when completing the templates to be sure that the project still build.
MutiDex
As specified in the Android documentation (https://developer.android.com/studio/build/multidex), when your app and the libraries it references exceed 65,536 methods, you encounter a build error that indicates your app has reached the limit of the Android build architecture:
trouble writing output:
Too many field references: 131000; max is 65536.
You may try using --multi-dex option.
or:
Conversion to Dalvik format failed:
Unable to execute dex: method ID not in [0, 0xffff]: 65536
To avoid these errors, the “multidex” option must be activated in the URS file:
<specific>
   <android multiDexEnabled="true">
   </android>
</specific>
The application will build using the Android multidex library and this will fix the 65,536 methods limitation. Be aware that applications that use multidex may encounter some limitations (see https://developer.android.com/studio/build/multidex). Before using multidex try to avoid the 64K limitation by reviewing your code, limiting the dependencies or optimizing the source code with proguard.
Network Security Configuration
NeoMAD now supports Network Security Configuration as specified in Android documentation : https://developer.android.com/training/articles/security-config. It allows you to declare specific network security configuration for your application without modifying the source code. Please consult the Android documentation for more information about this feature.
To declare a Network Security Configuration file in NeoMAD:
- Create your
network_security_config.xmlas specified in the Android documentation - Put the
network_security_config.xmlinto theres/xmlfolder of the NeoMAD project - If any raw files are required by the
network_security_config.xmlfile, put them into theres/rawfolder - Declare the
network_security_config.xmlfile in the URS (nothing to declare for associated raw files)
<specific>
   <android networkSecurityConfig="res/xml/network_security_config.xml">
   </android>
</specific>