iOS signature
NeoMAD enables applications for iOS to be built and simulated using the IPHONE, IPAD and IOS targets. The IOS target is used to generate applications compatible with both the iPad and iPhone devices.
The build action can only be done in a Mac environment.
On Windows, only the Xcode project will be generated. Developers will then need to move the generated project onto a Mac with Xcode to build the project.
Note
With Apple’s free developer account, binaries can only be built for simulators. Consequently, by default, NeoMAD will generate the simulator binary of the application.
To generate the application for an ad-hoc (on a device for tests) or an AppStore deployment a charged developer account is required.
Subscribing to an Apple developer program
Comparison of Apple developer accounts
The table below summarizes the differences between Apple developer accounts. This can be used to determine if a free account is enough or not.
| Free developer account | $99 developer account | |
| Build for simulator | OK | OK |
| Run on simulator | OK | OK |
| Build for mobile device or store | NO | OK |
| Install application on device | NO | OK |
| Publish application | NO | OK |
Enrolling on the Apple developer program
To enroll on a developer program, go to the developer portal. NB. To enroll on a charged program, developers first need to enroll on a free program.
Accounts are nominative. Consequently, to subscribe to an organization program, it ideally is the team administrator who must register on behalf of the organization. The administrator linked with the main account will be the team’s “agent”. He/she will be responsible for enrolling the other team members and allocating roles within the team.
For further details about available roles and their rights, please consult the member center portal (can be accessed only after subscription).
Note
Validation of registration for a charged account for an organization may take several days since Apple will contact it to validate the account information and to be sure that the person registering is an employee of the company.
All other team members must have a valid Apple account (free). Invitations must be sent to members using the e-mail associated with their Apple account.
Provisioning a device for development
To do the following steps, a charged Apple developer account is required. To run applications on a device, it must be set up for development. This process involves the following main tasks:
- Obtain a developer certificate that allows applications to be signed
- Declare a list of devices to use for testing
- Create an identifier for the application
- Obtain a provisioning profile that identifies the developer certificate, the device and the applications you can run on the device
- Install the development provisioning profile on the devices to use for testing
The four first points can be done at iOS provisioning portal.
Obtaining a development certificate
A development certificate identifies a developer. It is stored in the keychain of the Mac and includes a private key associated with the developer. Be careful, several certificates may be required for a company as they identify a member of the team and not the team itself. To create a certificate, follow these steps:
Start by generating a certificate signing request (CSR) on your computer:
- Launch Keychain Access, located in /Applications/Utilities
- Choose Keychain “Access > Certificate Assistant > Request a certificate from a certificate authority”
- In the Certificate Information window:
- In the User Email Address field, enter your e-mail address
- In the Common Name field, enter your name. This name will identify the certificate and will be necessary for further steps
- In the “Request is” group, select the “Saved to disk” option
- Select “Let me specify key pair information”
- Click Continue
- Choose your desktop as the location for the CSR file
- In the Key Pair Information pane, choose 2048 as the key size and RSA as the algorithm
The Certificate Assistant saves a CSR file to your desktop. It must then be sent to the mobile provisioning portal from the entry “Certificates > Development” and be approved by the team admin. The development certificate can then be downloaded from the portal.
Declaring a device for testing
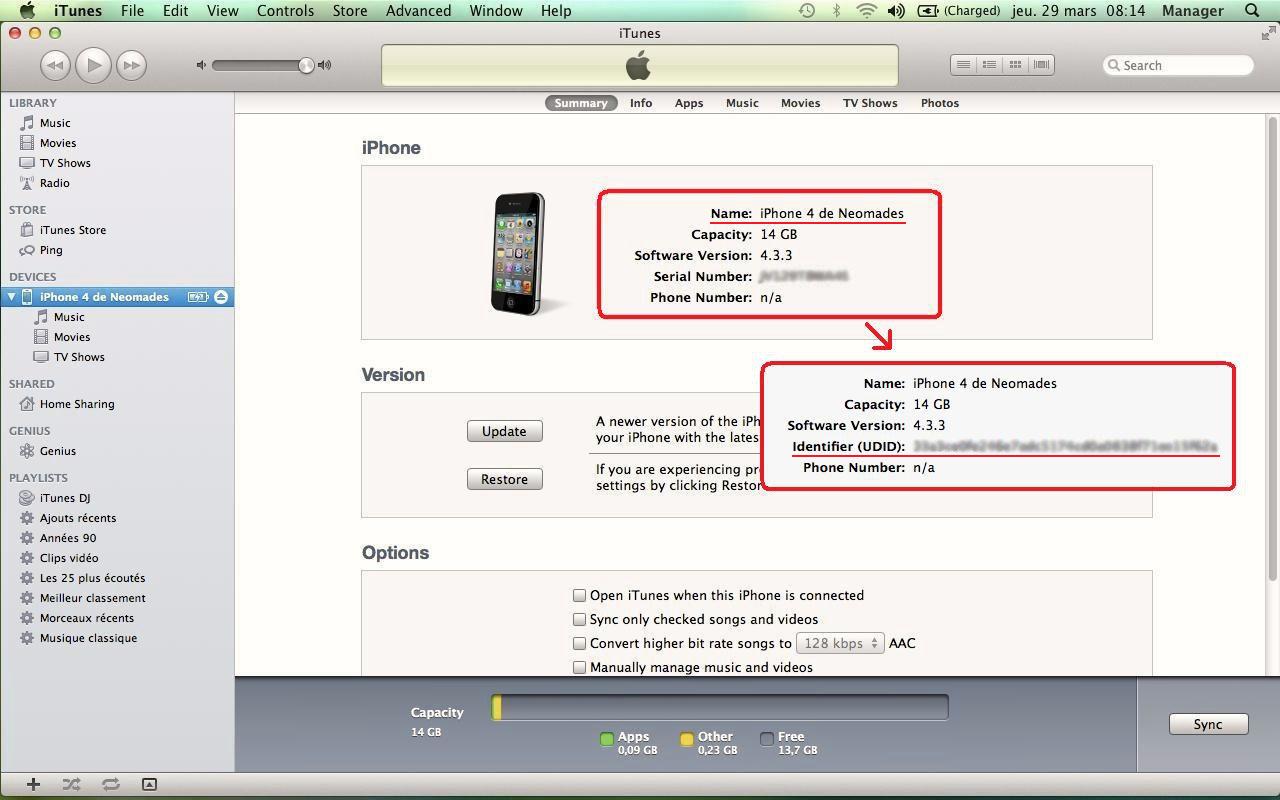
In order to be able to test an application on an iOS device, it must be linked with the development account. To register the device, its UDID must be uploaded to the iOS provisioning portal. The UDID is a 40 character string that is tied to a single device, similar to a serial number. The UDID can be found in iTunes when the device is linked to the computer.
This UDID must then be entered in the iOS provisioning portal through the “Devices > Manage” section.
For further details about how to find and upload UDIDs, please refer to the documentation under “Devices > How to” in the iOS provisioning portal.
Creating an App ID
The App ID is the application’s single identifier. It consists of a unique ten character string called the “Bundle Seed ID” (provided by Apple) and a Bundle identifier. When NeoMAD builds an iPhone application, the bundle identifier of the generated application will be applicationidentifier as indicated in the URS file. Be sure to indicate this value when entering an App ID in the iOS provisioning portal.
Remember that if the applicationidentifier parameter is not explicitly set, it will take the value of the packagename parameter.
A description is required too, it will only be used throughout the portal to identify this App ID.
For further details about using the AppID, please refer to the documentation under “App IDs > How to” in the iOS provisioning portal.
Creating the development provisioning profile
The development provisioning profile is the collection of all the information provided above. It ties developers and devices to an authorized iOS development team and enables a device to be used for testing. It groups together the certificates, device UDID and App ID of an application.
When creating a development provisioning profile, the following information is required:
- A list of certificates that identifies the developers who will be allowed to build the application for testing
- The App ID of the application to test with this profile
- A list of devices on which the application will be tested (cf. Declaring a device for testing).
Installing a development provisioning profile
The development provisioning profile must be downloaded from the provisioning portal and installed on the device (iPhone, iPod, etc):
- Save the file on the Mac, the location does not matter
- Go to “Finder” where the file was saved
- Drag and drop the permissions files on the “iTunes” icon in the DOCK
- Connect the device to the Mac
- Open iTunes and start synchronization between the iTunes library and device
The device is now ready to test the application.
Setting up the distribution assets
To distribute applications, a distribution provisioning profile is required. It will identify the developer or organization that provides the application. The following parts describe the process for creating the distribution provisioning profile.
Note
a charged Apple developer account is required.
Obtaining a distribution certificate
The process for creating a distribution certificate is the same as the Obtaining a development certificate process. Generate the certificate signing request (CSR) and then upload it to the provisioning portal from the entry “Certificates > Distribution”. The distribution certificate will then be created and can be downloaded from the portal.
Note
a development certificate cannot be used as a distribution certificate.
The main differences compared to the development certificate is that only team agents and administrators can create the certificate. An organization can have only one distribution certificate (however, it can be deleted and replaced). Note that since the certificate is created with a private key, it cannot be shared with other users, except if the private key is shared too. This is explained in greater detail in the next section.
Sharing a distribution certificate
To share a distribution certificate with team members, the private key of the certificate must be shared.
To share the private key, carry out the following steps on the Mac used for the certificate:
- Open “Keychain Access” in “Application > Utilities”
- In “Category” panel, select “Certificates”
- Expand “iPhone Distribution: “
- Highlight both “iPhone Distribution: team agent name” certificate and “team agent name” private key
- Right click and select “Export 2 items”
- Select location to save p12 file
- Enter password - this will be used to install it on the other machine
- Save and transfer p12 file to the second machine
On the second machine:
- Double click on p12 file. Keychain access should open.
- Enter password for p12 file. A new private key should have appeared in the login section in Keychain access. Note that this private key will have the same name as on the first machine
- Log onto the iOS provisioning portal
- Select “iOS Provisioning Profile” link
- Select the Certificates >Development tab, download and install certificate for Team Agent
- Double click to install to keychain
- Select the Certificates >Development tab, download and install the WWDR intermediate certificate
- Double click to install to keychain
- Select the Provisioning >Distribution tab and download the provisioning profile. NB. It should be a .mobileprovision file
- Drag onto Xcode icon to install
The distribution certificate can now be used with the second machine.
Creating an App ID
The App ID created for development can be used to distribute the application. If the App ID was not created, please refer to the Creating an App ID section for development.
Creating the distribution provisioning profile
The distribution provisioning profile will be used to sign the application. It identifies the application and the organization that distributes the bundle via its distribution certificate. The profile can be created in “Provisioning > Distribution” from the iOS provisioning portal.
When creating a distribution provisioning profile for an application, the distribution certificate will automatically be associated with the profile. Only the name of the profile and type of distribution is required.
There are two distribution modes:
- AppStore: to publish the application in the AppStore, the application will be visible to everyone
- Ad hoc: where a list of devices is required, the application can only be installed on these specific devices. NB. Only devices associated with the account can be selected. The application will not be visible in the AppStore.
Building and testing an application on a device
To build and test an application on a device, a development certificate and provisioning profile are required. Cf. Provisioning a device for development to create both.
- Download the development mobile provision from the iOS provisioning portal from the section “Provisioning > Development”. It is a .mobileprovision file.
- Add the provisioning profile to the project. Note that since this file can be shared between team members it is advisable to include it in the NeoMAD project
- Fill in the signature section of the URS file with the name of the certificate and path to the mobile provision file
<signature>
   <ios certificate = "iPhone Developer: Durand Bernard"
      mobileprovision = "provisioning/myprofile.mobileprovision" />
<signature />
- Build with NeoMAD using the IPHONE target on the Mac where the certificate is installed.
- Check for the .ipa file in the out directory. Double clicking on the file will deploy the application into the iTunes library
- Connect a device and synchronize it with iTunes to install the application. Only a device indicated in the provisioning profile can be used to deploy the application
Note
the xcodebuild command line tool must be installed to build the application. It can be downloaded and installed from Xcode in Xcode > Preferences > Downloads.
Note
to find the certificate name installed in a Mac, use the following command line in a shell: security find-identity -p codesigning -v.
Building for AppStore (or Ad-Hoc)
The process to build an application for the App Store is almost the same as the process to build an application for a development device.
- Download the distribution mobile provision from the iOS provisioning portal in “Provisioning > Distribution”.
- Add the provisioning profile to the project. NB. since this file can be shared between team members, it is advisable to include it in the NeoMAD project.
- If you want to build on a different machine than the one used to create the distribution certificate, download the distribution certificate from the “Certificates > Distribution” section and install it by double clicking on it. The certificate cannot be used if the private key is not installed, cf. Sharing a distribution certificate to learn how to share the key.
- Fill in the signature section of the urs with the name of the certificate and path to the mobile provision file.
<signature>
   <ios certificate = "iPhone Distribution: Neomades"
      mobileprovision = "provisioning/myprofile.mobileprovision" />
<signature/>
- Build with NeoMAD using the IPHONE target on the mac on which the certificate is installed
- Check for the .ipa file in the out directory. This file cannot be installed on a device but can be sent to the App Store.